Lepidoptera Survey Methods Utilized
in North American Journal of Lepidoptera Biodiversity Publications.
Hugo L. Kons Jr. & Robert J. Borth
North
American Lepidoptera Biodiversity LLC Home Page
[Most
recently updated
Note: This reference is solely a web based publication which is subject to future modifications and updating, as opposed to a static formal scientific paper.
This web page is a supplement to the
materials and methods section of North American Journal of Lepidoptera
Biodiversity publications reporting survey results from Kons and Borth
Lepidoptera surveys. It also can serve as a supplement to methods
sections of scientific collecting permit applications. NAJLB volume 1
provides case studies of the effectiveness and relative effectiveness of
different survey techniques for documenting adult Macrolepidoptera species
diversity in
MV/UV
Sheets
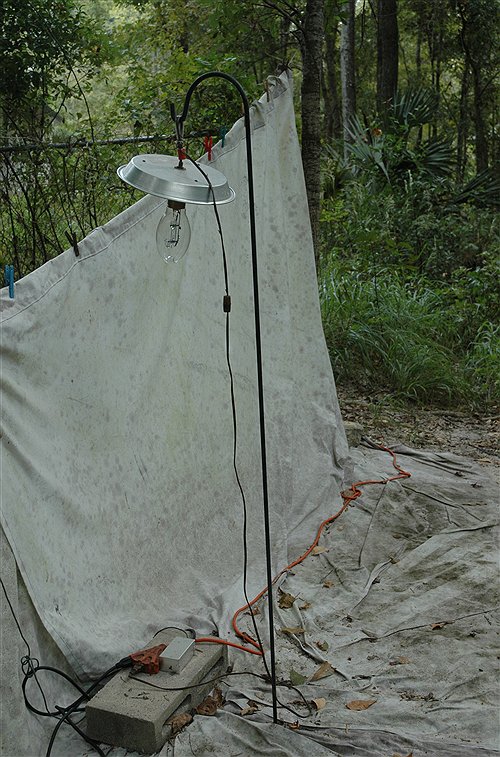
Illuminating a white sheet with
mercury vapor and ultraviolet lights and hand collecting representative
specimens which fly in to the sheet with jars is the most effective survey
method for documenting adult Macrolepidoptera species diversity. Staying
up all night collecting at a sheet can dramatically improve one's
results. We have found on warm nights the interval from about
MV/UV
Sheet:

MV/UV
Sheet:
MV/UV
Sheet Stand:
[Add Photo of Kons Sheet Stand]
MV/UV
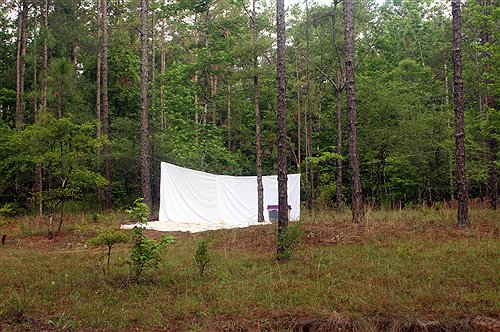
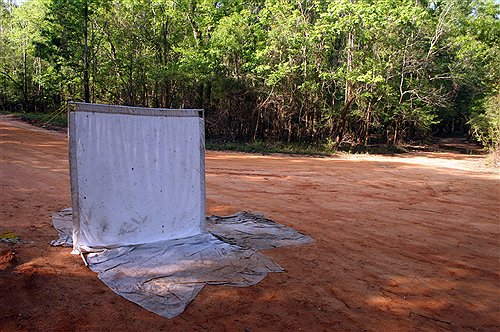
Sheet Stand: This is the
assembled structure for putting up a king sized white sheet with plastic pipes,
designed by Hugo Kons Jr. An advantage of this design is that it provides
more surface area for moths to land on the sheet relative to the previous
design. However, it has the disadvantages of being more vulnerable to
wind damage (due to the larger surface area of sheet) and requiring more pipe
length and thus more space in a vehicle. This structure is not
commercially available.
MV
Light Stand:
MV
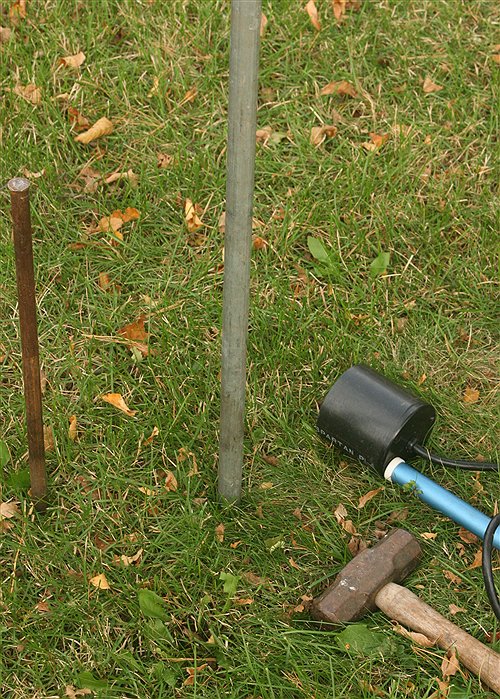
Light Stand. Photo Copyright Robert J. Borth 2006.
The grey section in the middle
of the above photo is the bottom of the MV light stand. This section
is hollow, and is placed over the stake on the left side of the picture.
The Blue section which supports the light is screwed into the top of the
grey section.
A
Shepherd Hook Used as a MV Light Stand: American Entomological Institute
Property,
UV
Traps
UV light traps are very important for
Lepidoptera surveys, as they allow one to collect all night without being
present, enable one to survey multiple habitat types and/or locations on a
single night (with multiple traps), enable surveys in locations where utilizing
a sheet would be difficult or unfeasible, and enable surveys under conditions
when it is not possible to run a sheet (such as high wind). In addition,
UV traps are very useful for quantitative sampling if one has the opportunity
to collect in an area repeatedly. However, on any given night actively
collecting all night at an individual MV or UV sheet will yield a species total
considerably higher than an individual UV trap, providing the habitat is
similar. The combination of a sheet and several light traps is ideal for
doing surveys, especially when the UV traps can be placed in different types of
habitats from where the sheet is located.
Where AC power is unavailable, UV
traps can be operated with DC UV lights powered by deep cycle outboard
batteries. The 15 watt DC UV lights we use in our surveys were purchased
from BioQuip Products. These lights are very durable including under
adverse weather conditions such as high wind and heavy rain. We power our
UV lights with deep cycle outboard batteries, which reportedly are more
resistant to being run all the way down relative to regular batteries. A
34 amp hour battery will run a UV trap at least one night when it is new, and
is fairly easy to carry long distances away from a vehicle. When Kons was
doing surveys in WI during the early to mid 90s, he found that a new 34 amp
hour outboard battery purchased from Fleet Farm would run a UV trap 3 nights,
but in recent years we have been finding batteries of this size only tend to
run a 15 watt UV light for one full night and part of a second when they are
new. Walmart no longer carries 34 amp hour outboard batteries, but they
can still be purchased from Fleet Farm. The larger outboard
batteries are essential for multinight collecting trips without access to AC
power for battery recharging. Deep cycle batteries of various sizes
larger than 34 amp hours can be purchased at Walmart or Fleet Farm, and
doubtlessly numerous other stores. The disadvantage of these batteries is
that they are quite heavy, and difficult to carry long distances from a vehicle,
especially under hot conditions or over rugged terrain.
When a UV trap is placed too far
away to be easily turned off at dawn, one can conserve battery power by
purchasing DC photo cells from BioQuip Products. The photocells should
not be used on traps located close enough to be easily turned off manually
at dawn, because they use more power than just running the UV light by itself
for the time they are on, and they are not as durable or reliable as the
DC UV lights. Photocells will frequently stop working and shut the UV
light off if they are exposed to moisture such as rain, and sometimes this
happens even under dry conditions. When the photocells are exposed
to moisture and stop working, if they are dried out they usually will start
working again. We have got around the rain problem by placing the photo
cells in quart sized zip loc bags, and orienting the bags in such a manner
that rain will not get in. When AC power is available, one may
purchase an AC photocell from Walmart much more cheaply than a DC photocell
from BioQuip. Also, Kons has been using an AC photocell
purchased from Walmart at the AEI property in northern
When AC power is available there
are more options to choose from for what light to use in a UV trap.
At the AEI property in northern Florida, Kons has been using a 33 watt BL UV
light manufactured from General Electric (product number 47912), and this light
holds up well under the rainy, humid Florida conditions, despite the product
containing a warning to avoid moisture. However, this light is
problematic for sheet set ups, because it can easily detach from its chord and
fall to the ground and break, whereas in the trap it rarely becomes
detached and when it does the short distance it falls does not damage the
light. BioQuip Products sells a 15 watt AC UV light comparable to the DC
version, which is very durable under field conditions, and which cannot become
detached from the electrical chord.

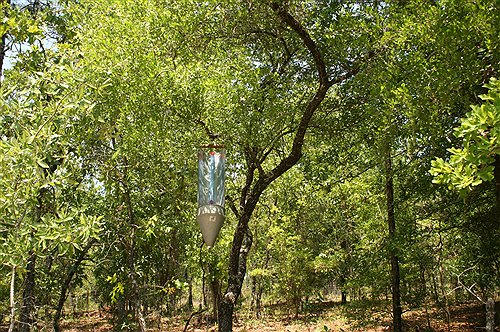
UV
Trap (Front) with 33 watt BLB AC UV Light.
American Entomological Institute:
The trap frame was constructed by
Hugo L. Kons Sr., based on a design by Hugo Kons Jr. The frame consists
of a sawed off tractor fueling funnel bolted to a metal pipe, which forms a
half circle around the rim of the funnel. At the top, a wooden piece is
bolted between the sides of the pipe, and a metal kook is screwed into the top
center of this wooden bar. The trap is suspended from tree branches with
the metal hook. If branches are too thick for the metal hook, we clip
shower rings onto the branch and attach the hook to the shower ring. The
trap frame design represents a modification of a design previously
published in [FILL IN INFO].
UV
Trap Frame (Front View): Southwest Corner of Highways I10 and 279,
UV
Trap Frame (Lateral View): Southwest Corner of Highways I10 and 279,
UV
Trap Frame (Back View):
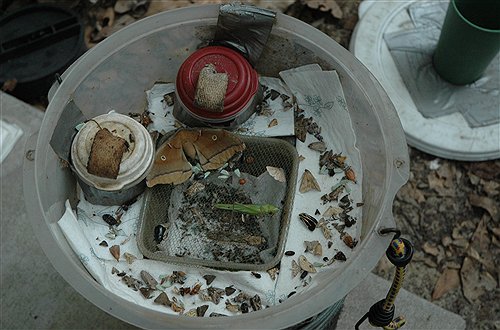
UV Trap Collection Container (Open). Photo Copyright David B. Wahl
2006.
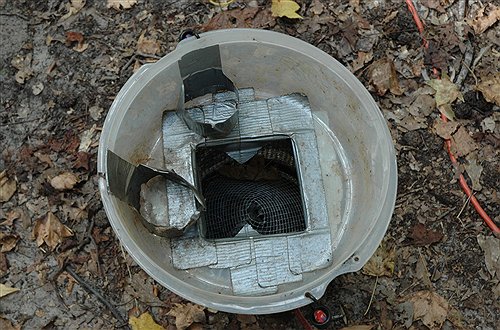
Inside
of UV Trap Collection Container with Components Removed. Photo Copyright David B. Wahl 2006.
The UV trap container is constructed
from a 2 gallon circular Rubbermaid container. This container is attached
to the trap frame with two bungee chords which hook over the lip of the tractor
fueling funnel on the sides where it connects to the metal pipe. The
bottom of the sawed off tractor fueling funnel fits into a hole in the cover of
the Rubbermaid container (illustrated below). The plastic square piece in
the center serves as an extremely reliable rain drain, which keeps the trap
catch dry (excluding small specimens which get through the mesh into the rain
drain, or specimens which die on top of the rain drain) even under 40-60 mile
per hour winds and heavy rain associated with tropical storms. The rain
drain container fits through a square hole in the bottom of the trap.
This hole was covered with duct tape on both sides and then an X was cut
through the duct tape between the four corners. When the rain drain is
inserted through the X in the duct tape, a seal is formed eliminating the
possibility of specimens falling out of the trap between the bottom of the
rubbermaid container and the rain drain. A fine net mesh is attached over
the top of the rain drain with a rubber band. Most Macrolepidoptera
specimens will not get through this mesh into the rain drain, but some
microlepidoptera and some of the smallest Macrolepidoptera specimens may
go through the mesh and into the rain drain. The bottom of the rain drain
(under the paper towels) has four holes in the plastic container where water
drains out. The bottom surfaces of the trap and rain drain are covered
with soft, thick paper towels (we use the Viva brand). The red and white
circular containers adjacent to the Saturniid Antheraea polyphemus
are the ethyl acetate wicks. Unfortunately, Rubbermaid appears to have
discontinued this type of plastic container, and the new model is wider on the
top and thus not suitable for a trap of these dimensions. The wicks are
filled with ethyl acetate when the trap is put up. This chemical may be
purchased from BioQuip Products by anyone. It is less expensive if
purchased from Fischer Scientific, but this discounted rate can only be
obtained through the account of an educational institution. The wicks are
placed in wick holders made from two rings of duct tape (the sticky sides of
the tape are stuck together and not exposed), which are duct taped to the side
of the trap. This ensures that the wicks will never turn over unless the
trap is tilted over 90 degrees (tilting the trap container should be
minimized to prevent specimens from sliding on the paper towels and loosing
scales). Care must be taken to ensure that no paper towels are in contact
with the wick material or the top of the rain drain. Otherwise, ethyl
acetate or water, respectively, will wick throughout all of the paper towels in
the trap. The illustrated trap catch is from
A downside to this design is that the
trap container cannot be placed on a flat surface without popping the rain
drain container out of place. When the rain drain is popped out,
specimens may fall out of the trap through the square hole in the bottom.
This problem is eliminated by setting the trap on any container with an opening
wide enough and deep enough to accommodate the rain drain. The below picture shows the trap container sitting on an open
minnow trap. An alternative strategy would be to glue legs on the
bottom of the trap container long enough to accommodate the length of the rain
drain.
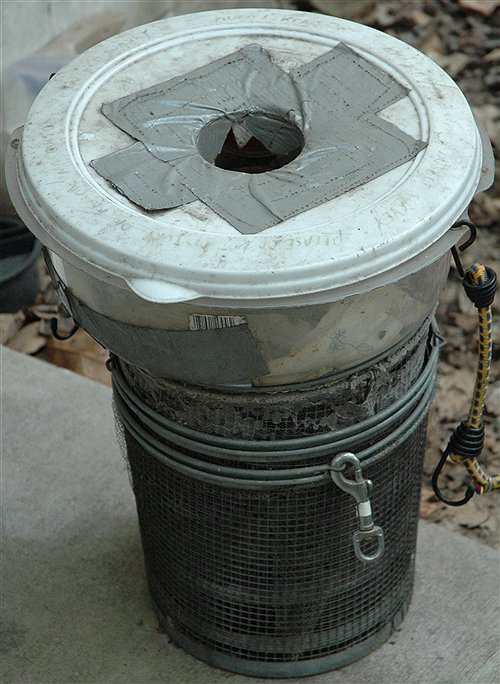
UV Trap Collection Container (Closed) Sitting on Top
of a Minnow Trap.
Photo Copyright David B. Wahl 2006.
This picture illustrates the same
trap container in the preceding picture, but shows the top cover in
place. The metal minnow trap container below the plastic cylinder is not
part of the trap container, but only used as a stand to prevent the rain drain
from popping out of place. The circular hole in the cover is where the
bottom of the tractor fueling funnel is inserted into the plastic trap
container. This hole was covered with duct tape on both sides (such that
no sticky side of the duct tape is exposed) and a
X was cut through the center of the duct tape. This forms a better
seal between the trap frame and the trap container, reducing ethyl acetate
evaporation to the outside.
BAITING
Baiting involves attracting individuals
of certain species of Lepidoptera to fermenting fruit baits. The variety
of species attracted to these baits is much less than the variety which may be
attracted to lights, but there are a number of Lepidoptera species which come
much more readily to rotting fruit baits than to lights. When bait is
working well, the use of bait trails and/or traps can add considerably to
recorded species totals. For reasons we largely do not understand, the
success of baiting is extremely variable spatially and temporally. NAJLB
Volume I provides case studies of the effectiveness of
baiting at documenting Macrolepidoptera species diversity in northern
Baiting surveys can be performed with
bait traps or bait trails. We have used a variety of different types of
bait traps, which we illustrate and discuss below. Bait trails consist of
bait placed on tree trunks or strips of felt suspended from nylon twine (=felt
lines). Both bait trails and bait traps have some advantages,
so ideally surveys with bait will involve the use of both. However, not
all survey sites have a lot of easily accessible tree trunks suitable for
baiting trees or putting up felt lines, and on short collecting trips time
can be too limited to utilize both techniques. A discussion of some of the relative
advantages of the two techniques follows.
Advantages
of bait traps relative to bait trails:
* Bait
traps may attract a variety of Lepidoptera even when bait trails are
ineffective. This is probably due to the larger volume and concentration
of bait that is used in bait traps. If one is surveying in an area and
finds bait trails are adding little to species totals, it should NOT be
assumed that this will be the case with bait traps.
* Bait
traps allow one to conduct surveys at times they are not physically present at
the site. For example, one cannot be watching a sheet and checking a bait
trail at the same time.
* Bait
traps may be used in a variety of areas where finding suitable spots for bait
trails is problematic. Baiting trees requires easily accessible tree
trunks, whereas this is not important for bait traps.
* Much more skill is required
to effectively survey Lepidoptera from a bait trail, with respect to seeing
Lepidoptera camouflaged on their substrate (such as a tree trunk) and with
respect to capturing voucher specimens.
Advantages of bait trails/felt lines:
* Bait
trails enable one to bait a much larger area.
* Bait
traps are expensive or time consuming to custom make, and they are susceptible
to vandalism by humans or damage by animals such as raccoons or bears. In
contrast, besides the bait a bait trail requires only a paint brush and a bait
container, or in the case of a felt line one needs only nylon twine, felt,
clothes pins, and a bait container.
* At
times when bait is attracting large numbers of Lepidoptera, bait traps may
become very cluttered. This may make it difficult to pick out all of the
species present among large numbers of individuals of common species,
and/or result in some desired specimens becoming worn.
* Bait
may also attract stinging insects, such as Vespids, Pompilids, and fire ants,
making it difficult to collect out of bait traps without risking getting
stung. Bald faced hornets can be especially problematic, because of their
aggression and painful sting. Also, some species of vespids may prey upon
Lepidoptera specimens in a bait trap.
* Running
multiple bait traps requires one to purchase and transport much more bait than
is required to put up bait trails.
* Painting
bait on tree trunks may require less time than other methods, particularly when
baiting is conducted well away from a vehicle. One does not need to pick
up traps or conduct any clean up (banana bait on tree trunks does not persist
in the environment for very long).
* The
ideal time to check bait traps is right after sunrise, as specimens may beat up
their wings when the sun shines on the traps, especially if there are many
specimens in a trap. Unfortunately,
right after sunrise is also the most comfortable time of the day to sleep when
one has stayed up all night collecting.
This is also a time when mosquitoes can be especially voracious when one
is standing relatively still and checking a bait trap.
BAIT
TRAPS
The bait trap has become an
indispensable tool for conducting our Lepidoptera surveys, and has been the
subject of much experimentation. We provide a brief chronological history
of our trap usage followed by a more detailed explanation and illustrations of
the various trap designs.
1979 – Inverted Cone Platform
Bait Trap
RJB began using this trap
design, which had originally been illustrated by Austin Platt in the Journal of
the Lepidopterists’ Society in 1969, to collect tropical Lepidoptera in
1988 – Minnow Trap (Type F
Trap)
HLK began raising baited
minnow traps into canopy overhangs at various
1989 – Inverted Cone Platform
Bait Trap/Minnow Trap Usage in
RJB used both these traps in
the canopy every day for a month in
1990 – Modified Inverted Cone
Platform Bait Trap (Type P Trap)
HLK received a more effective
type of inverted cone trap with a larger opening from Richard Merkhofer. HLK slightly modified the design of this
trap to make the cone lower, improving effectiveness somewhat. These traps were built by Sharon Kons, and proved considerably more effective than the
original inverted cone trap design; however, there were some problems with
escape.
2002 – Inverted Cone No
Platform Trap (Type NP Trap)
HLK modified some type P traps
by replacing the platform with a plastic container with entrance slits that
attached to the bottom of the hole in the inverted cone. This design
often outperformed the platform inverted cone traps where the two designs were
run in close proximity at the American Entomological Institute property in
2002 –Koehn Bait Traps (Type
K Traps)
RJB purchased a couple traps
from Leptraps, Inc. These traps, designed by
Leroy Koehn, added a new platform bottom with an 8 ½” pie tin bait holder to
the bottom of the standard 36” high, 15” diameter cylinder. The inverted
funnel was eliminated as insects would enter from a one inch gap between the
aluminum pie tin and flat plywood ring bottom. These traps were sturdy
but somewhat heavy, and they took longer to set up in the field. On our first collecting trip using both Koehn
traps and NP traps we did not note a significant difference in performance
between the two.
2004 – 2 Gallon Rubbermaid
Plastic Containers Used for Bait
In the Spring
of 2004 we traveled to the
2006 - Our Current Cylinder
Trap with Plastic Container Bottom (Type H trap)
HLK eliminated the heavy platform bottom
from the Koehn trap and instead dropped the two gallon plastic container into a
flat circular plywood ring bottom. Slits at the top allow entrance but
virtually no escape. These traps have often been very effective with a
large bait volume, and we have found they outperform all of the other types of
bait traps. In addition, they are simpler to construct, light, sturdy,
and quite escape resistant. RJB built some traps with an extra wooden
ring around the plastic container so Lepidopterans
would have a shelf to land on, but we have not noted any difference in
effectiveness between traps with this extra ring and those without it. We ran up to ten and eleven of these traps in
the
Selecting
Bait
HLK has frequently placed two identical
bait traps right next to each other with different types of bait, to gain
insight into what baits are most effective. As a result, we primarily
bait our traps with rotten bananas, but sometimes also use rotten
plantains and rotten applesauce. Rotten bananas and plantains are most
effective when the fruit is at the stage of rot where it is a yellow
mush. It is possible plantains may be somewhat more attractive than
bananas when they are at this stage, but a downside to plantains is that they
are more expensive, available at fewer stores, and the rotting process takes
much longer to achieve the optimal stage of rot. Rotting Applesauce is a good bait for felt lines (below) and it is not clear if it
may improve effectiveness in some cases if used in addition to rotten bananas
in traps. However, it can dry out quickly in bait traps, and also
sometimes some Lepidoptera individuals become stuck in the applesauce if a
large quantity is used. HLK has found no indication that adding brown
sugar to solid baits in bait traps improves bait effectiveness. HLK
has tried all of the liquid baits mentioned below (in the section on relative
effectiveness of baits for bait trails) and found none of them work as well as
rotten bananas, and they all are problematic with respect to Lepidoptera
drowning in the liquid. Rotten bananas have consistently outperformed
rotten apples, rotten pears, rotten peaches, and rotten
grapes.
Bait
Trap Designs
Cloth
Cylinder Bait Traps: We
have used four designs of cylinder traps which we illustrate and discuss
below. All of these trap designs contain a
zipper on the side, which is unzipped to collect desired specimens. One
note that applies to all cylinder traps is we do not recommend collecting
nocturnal species out of these traps at night if it can be avoided, as in our
experience this increases the chance desired specimens will escape.
Lepidoptera individuals almost never escape from type NP or type H bait traps
before they are opened. The best time to collect nocturnal species from
these traps is right after sunrise during the coolest part of the day and
before the sun starts shining. Once the sun shines on a trap,
Lepidoptera are more active and more difficult to collect, and specimens might
become worn if the trap is very crowded. On the other hand, in the very
early morning when it is still somewhat dark (dusk like conditions), on warm
nights Lepidoptera may be very active at this time, so the optimal window to
check the traps can be rather small. Checking traps in the early morning
is less important for traps which are placed in shaded locations or which are
not crowded with many specimens.
Type
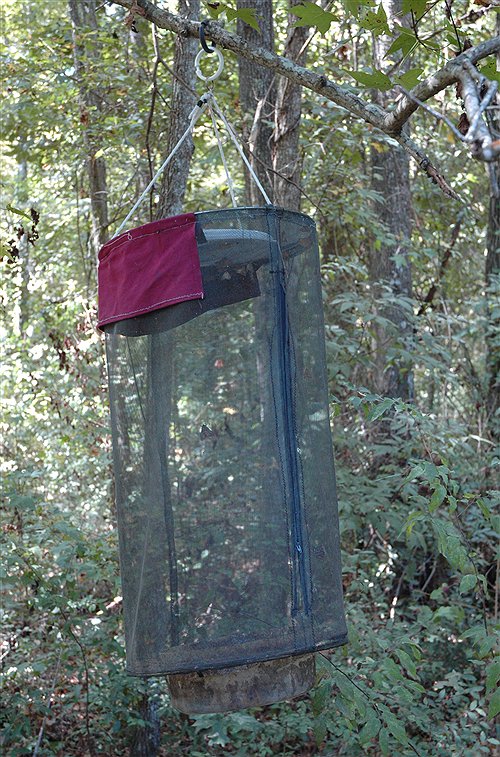
H Bait Trap:
Type
H Bait Trap Close-Up: American Entomological Institute:
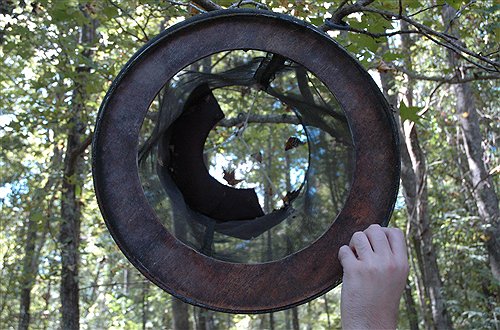
Type
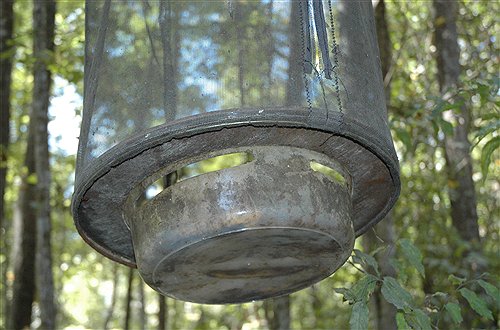
H Bait Trap (Bottom). Photo Copyright David B. Wahl
2006.
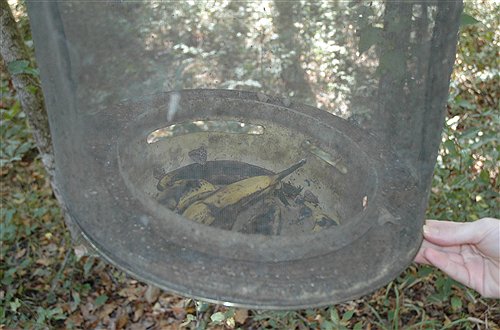
Type
H Bait Trap (Inner Bottom). Photo Copyright David B. Wahl
2006.
Bottom
of Type H Bait Trap with Bait Container Removed. Photo
Copyright David B. Wahl 2006.
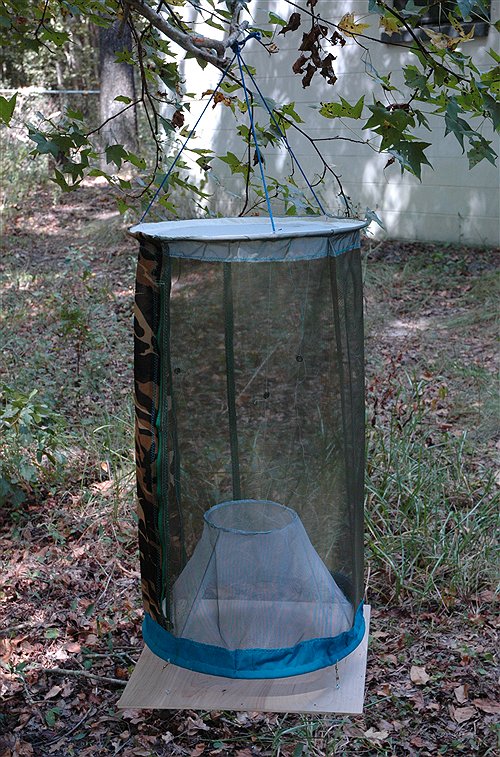
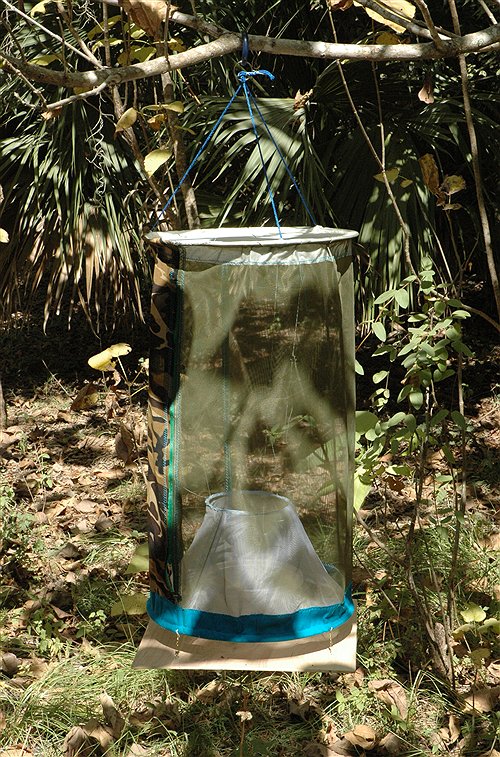
Type
H Bait Trap: This is our most recent and
most effective bait trap design, which we began using in 2006. The
illustrated bait trap was constructed by Sharon Kons and designed by Hugo Kons
Jr. The plastic container in the bottom was modified by Danny McFather
according to HLK's specifications. The components include a cloth
cylinder with a circular wooden bottom with a large circular hole. This hole
is the right size for fitting in a Rubbermaid 2 gallon circular plastic
container. The plastic container contains slits near the top, whereby
Lepidoptera enter the trap to access the bait placed at the bottom of this
container, but very rarely escape until they are released deliberately by
removing the bottom. Specimens which are not collected may be easily
released by removing the plastic container and wooden circular platform from
the bottom of the trap, and then shaking the trap out.
Koehn
Bait Trap (Type K Bait Trap):
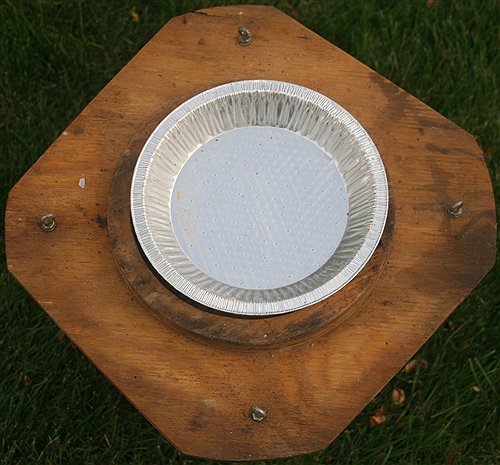
Bottom Section of a Koehn Bait Trap. Photo Copyright Robert J. Borth
2006.
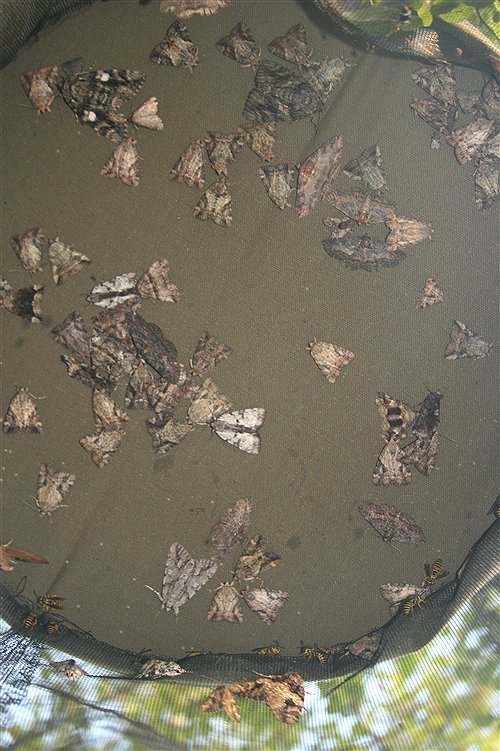
Inner
Top of a Koehn Bait Trap After a Collecting Night:
Koehn
Bait Traps: This bait trap
was purchased from and designed by Leroy Koehn. The trap consists of a
cloth cylinder with a large hole in the bottom. The cylinder is attached
to a wooden platform with four eye hooks, and bait is placed in an aluminum pie
tin on the platform under the hole in the bottom of the cylinder. This
bait trap design tends to be the second most effective among the bait trap
designs we have utilized, with only the type H design tending to be more
effective. However, the type H trap design needs to be custom built and
is not commercially available, whereas Koehn bait traps can be purchased directly
from Leroy Koehn. Compared to the type H trap design, Koehn traps are
heavier on account of the solid wooden platform, and they are more difficult to
set up. There are more problems with escapees from Koehn traps
relative to other bait trap designs; however, with the exception of the type H
trap this difference is often more than compensated for by trapping more
individuals in the first place. Releasing specimens from Koehn traps is
slightly more time consuming than type H traps, but much quicker than with
inverted cone cloth cylinder traps (type P and type NP traps).
Type
NP Bait Trap: American Entomological Institute Property,

Type NP Trap Bait Container. Photo Copyright David B. Wahl
2006.
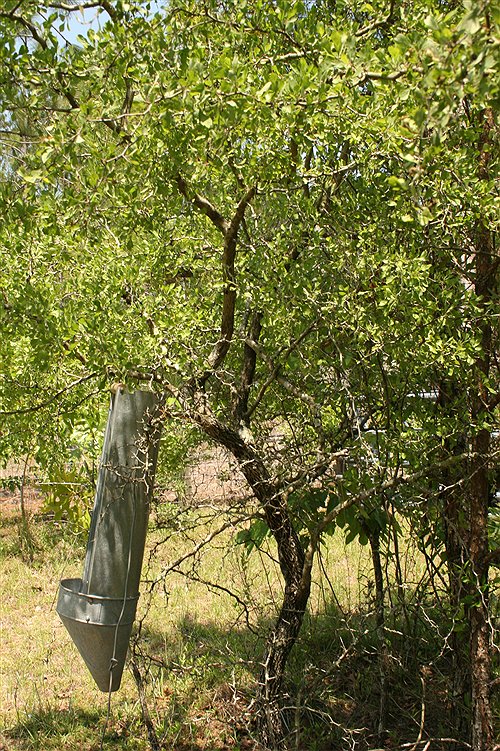
Inverted
Cone Bait Trap with No Platform (Type NP Bait Trap): A type NP bait trap is identical to a type P bait
trap (below) except that the platform is removed, and
the container housing bait attaches to the opening in the inverted cone.
Bait is placed in the bottom of this container, and moths enter through slits
in the side. This concept is similar to the type H trap, and was a
precursor to the type H design. Kons began using this trap design in
2002, after learning it reduced escapes to essentially nil (in contrast to the
type P trap) and averaged more moths than a type P trap. The bait
container was constructed from two components, the top which
was selected to fit into the opening in the inverted cone, and the bottom
which was selected to be deep enough as to hang below the level of the inverted
cone when the trap was suspended. This trap design does have several
disadvantages. One is that the trap container is an awkward size and
shape, and storage of this container is problematic for collecting trips where
space is at a premium. The other disadvantage is that the bait container
has limited volume, and only a couple rotten bananas can be used at one time
without covering the entrance slits. These disadvantages were eliminated
with the type H bait trap design, which eliminated the cone altogether and
allowed for a wider but shallower container that can hold a much larger volume
of bait.
Inverted Cone Platform (Type P) Bait Trap. Photo Copyright David B. Wahl
2006. The bait
container is not shown. It is placed on the wooden platform directly
under the cone.
Type P Bait Trap with Plastic Bait Container of
Appropriate Dimensions. Photo Copyright David B. Wahl 2006.

Bottom
of Type P Bait Trap (the platform has been removed and the trap is being held
upside down to show the cone). Photo Copyright David B.
Wahl 2006.
Inverted
Cone Bait Trap (Type P Bait Trap): A type P bait trap involves placing a dish of bait on a
platform underneath an inverted cone with an opening. The illustrated example
is based on a slightly modified design from a trap Kons received from Richard
Merkhofer. The traps of this design used in the Kons-Borth surveys were
custom built by Sharon Kons, and are not commercially available. This
design works considerably better than some commercially available inverted cone
bait traps with higher cones and a smaller opening above the inverted
cone. The inverted cone opens into a cloth cylinder. The platform
is attached to the cloth cylinder with only a narrow 360 degree opening between
the cylinder and platform. Lepidoptera travel through
this opening to feed at the bait dish. When done feeding, some
individuals fly up through the open inverted cone and become trapped, whereas
others leave through the side the way they entered. Based on many
nights of running this type of trap in the same areas with type H, type NP,
and/or type K bait traps, it is clear that this trap design tends to yield
fewer Lepidoptera relative to these other designs. A major disadvantage
is many of the Lepidoptera that come to feed at this type of trap leave out of
the opening between the cylinder and the platform, and never fly up through the
inverted cone and become trapped. This performance factor is also
influenced by the type of bait container used on the platform-a container with
higher sides tends to increase the likelihood that individual Lepidopterans
will become caught in the trap. Another disadvantage is that escapes are
not uncommon with this trap design, when Lepidopterans fly back out of the
opening of the inverted cone and escape out of the side (escapes are less
common than with a Koehn trap, but a Koehn trap tends to trap more
individuals in the first place). Type P traps are light weight, and can
be put up quickly and easily in the field. Cool Whip containers or any
number of similar plastic containers work good as bait
dishes.
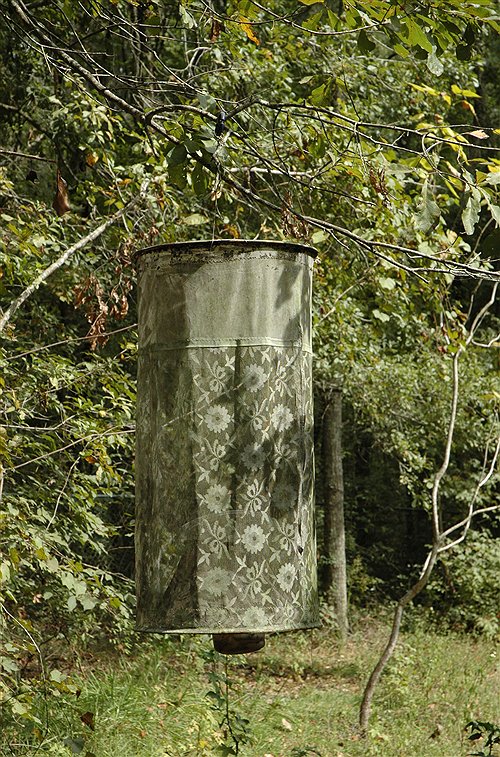
Type
F Bait Trap (Lateral View): American Entomological Institute Property,
Type
F Bait Trap (Oblique Side View): American Entomological Institute Property,
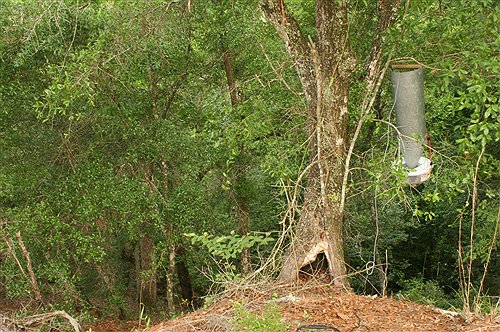
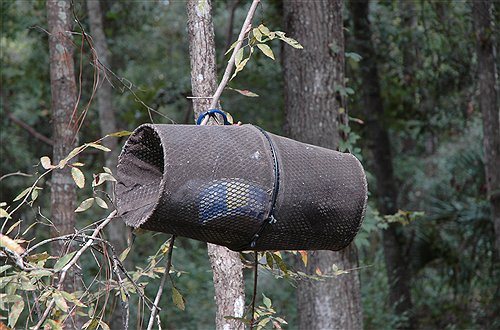
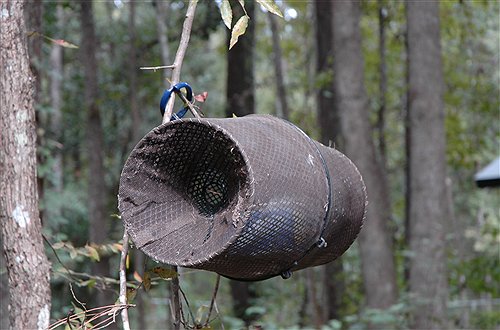
Type
F Bait Traps: This trap
design consists of a commercially available minnow trap used as a bait trap for
Lepidoptera. Kons came up with this idea in 1988 in WI. The mesh in
the minnow traps is fine enough to trap Lepidoptera species in genera such as Catocala and
Zale,
but for many of the smaller Noctuids a finer mesh must be sown
around the trap to prevent individuals from escaping out of the holes in the
mesh (the illustrated example includes this modification, done by Sharon
Kons). Each side of the trap contains an inverted cone with a small
opening, and bait is placed in a cool whip or other plastic container inside of
the trap. The trap is opened by splitting it into two halves, which are
reassembled with a clip. This trap is light weight and very easy to put
up in the field within normal reach. However, some of the best successes
with this trap have involved placing it in a canopy overhang. This is
accomplished by throwing a roll of nylon twine over a canopy overhang,
and attaching one end of the twine to the clip. One can then pull on
the other end of the twine and raise the trap up to be nestled into the canopy
overhang. Caution must be used when applying this technique to pine
trees, as we have had some problems with sap permeating the nylon twine and
leaving the trap stuck in the canopy. Releasing specimens which are not
collected from this trap is extremely easy, as one needs
only to open the two halves and shake them out.
This trap design can be very
effective, especially in canopy overhangs for the genus Catocala.
On many occasions Kons has found these traps loaded with Catocala in
WI, where they often trapped more individuals and species than Type P traps in
the same vicinity. All but one of Kons' records for Catocala luciana in WI were obtained with this type of
trap in a canopy overhang.
However, this trap design has two
very significant disadvantages. One is the trap can quickly become too
crowded with individuals of larger species (such as Catocala, Darapsa, Amphion,
Nymphalis, Polygonia, Vanessa, Astereocampa, etc.) resulting
in many individuals flying around and beating up their wings. These traps
must be checked and emptied frequently when bait is working well to obtain
specimens in good condition. The cloth cylinder traps will hold larger
numbers of individuals in good condition for a longer period of time. The
other major disadvantage is collecting specimens out of these traps is much
more difficult than with any of the cloth cylinder designs. The best
technique is to open the trap at night right next to a MV sheet. Most
nocturnal and diurnal species in the trap will fly right to the sheet,
including species in the area which are coming readily to bait while largely
ignoring the sheet otherwise. However, with this approach some desired
individuals may leave the sheet before they can be collected. This
approach is also problematic for studies where one desires quantitative data on
the number of species coming to the sheet and bait trap individually, as it is
easy to become confused as to whether some individuals originated from the bait
trap or the sheet. When these traps are opened during the day, one
approach is to first place them inside of a cooler with ice before attempting
to open them. Obviously such an approach is inefficient in terms of time
and space. Alternatively, the traps can be opened inside of a net large
enough to hold the entire trap.
Bait
Trails/Felt Lines: Bait
trails/felt lines involve placing bait on trees or felt strips and later
searching for Lepidoptera in the baited areas. For reasons discussed
below, we recommend a paste-like bait of mashed rotten bananas and brown sugar
for bait trails on trees, and either this same bait and/or rotten applesauce
mixed with brown sugar for felt strips. For nocturnal collecting, a
net is often unnecessary and just gets in the way, but it may be essential for
some especially wary species like Catocala delilah and
some of the other larger Catocala. In general, a good
sampling approach is to shine a flashlight at the trees just to the side
of where the bait is located, such that there is enough light to see the moths
but the flashlight beam is not shining on them directly. If the
flashlight beam hits the moths directly moths have a greatly increased
tendency to fly off of the bait and at the flashlight beam. The
collecting techniques for felt and baited trees are somewhat different,
and are discussed below in the sections on each method.
Relative
Effectiveness of Different Baits on Bait Trails/Felt Lines: Felt lines provide an easy opportunity to examine the
relative effectiveness of different bait recipes, by baiting alternating felt
strips with two different types of bait. Extraneous variables that would
exist with a bait trail, such as tree diameter and texture, are eliminated with
this approach. Kons has examined a wide variety of baits in this manner,
including rotten bananas, rotten applesauce, rotten grape juice, rotten apple
juice, rotten apple-banana juice, rotten banana juice, stale beer, grape wine,
apple cider vinegar, molasses, brown sugar, and various combinations of these
ingredients. It is essential that such comparisons be made on the same
night in the same locality, as the effectiveness of any type of bait that
attracts moths is extremely variable spatially and temporally, thus comparisons
between sites or different nights generally provide no insight into the
relative effectiveness of different baits. While strict quantitative
sampling and statistical analyses were not used, qualitative observation was
adequate to make some conclusions on the relative effectiveness of different
baits. Of the above baits, the most effective combinations
are mashed rotten bananas mixed with brown sugar and all natural rotten
apple sauce mixed with brown sugar. How much brown sugar should be mixed
in depends on how liquidy the bait is that it is being mixed with, thus going
by precise measurements is pointless. We recommend mixing in enough brown
sugar to get a wet paste-like bait, but not so much
that the bait becomes dry and crusty. More brown sugar
is optimal for painting trees on a bait trail than for felt strips,
as the longevity of bait on a felt line tends to be longer. Some hands on
field experience is necessary to learn how to make
judgments on how much sugar to add. It is not clear that the brown
sugar does anything to improve the effectiveness of these baits right
after they are put up, but the brown sugar makes the bait thicker and it
remains effective longer than if brown sugar is not used. On some
occasions rotten fruit juices seem to perform as well or nearly as well as the
banana or apple sauce baits right after they are put up, but after a few hours
the effectiveness of fruit juice bait drops off considerably, especially under
dry conditions. Also, the effectiveness of liquidy baits lasts notably
longer on felt lines than on tree trunks. The banana or apple sauce
brown sugar baits will remain at least somewhat effective during and after
light to moderate rain, whereas fruit juice baits quickly loose effectiveness
under rainy conditions. Apple cider vinegar, molasses, beer, and
wine can attract moths when bait is working well, but they are much less
attractive than banana or apple sauce baits, and on some nights when banana and
apple sauce baits have attracted moderate or low numbers of moths these other
baits have attracted few to none. Furthermore, Kons has seen no
indication that adding either molasses, apple cider vinegar, beer, or
wine, to apple sauce or banana bait does anything to increase the
effectiveness of these baits; however adding liquid baits reduces the
longevity of the bait's effectiveness by making the bait more
fluidic. The relative effectiveness of rotten banana and rotten
applesauce baits on felt is variable; on some nights one bait
type has outperformed the other whereas on other nights both have performed
comparably well. However, in Kons' experience banana-brown sugar
bait tends to be much more effective on trees than apple sauce-brown sugar
bait. Banana mush is thicker than apple sauce, and persists on trees much
longer.
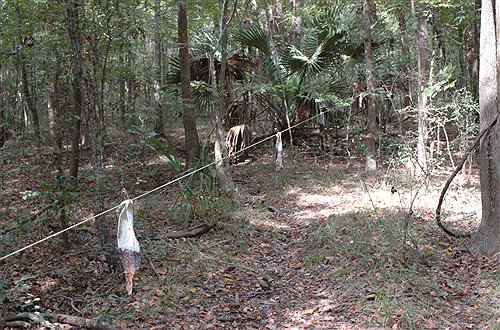
Baited
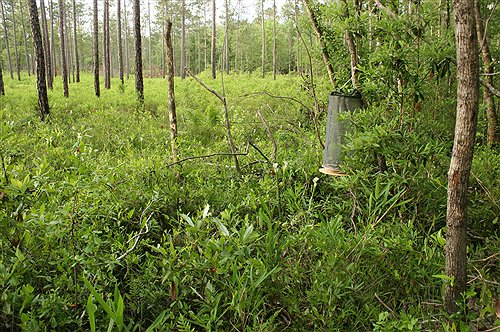
Felt Line: American Entomological Institute Property,
Catocala Desdemona, Pseudaletia unipuncta, and Hemieuxoa rudens feeding at felt strip baited with
rotten apple sauce and brown sugar.
Photo copyright Robert J. Borth 2006.
Baited
Felt Lines: Baited felt
lines involve tying nylon twine between two trees and attaching strips of felt
with clothes pins or safety pines. Using safety pins requires more time
initially, but this will prevent animals from pulling down the felt in areas
where this could be a problem. The felt strips can then be dipped in
bait, and checked later to collect Lepidoptera landed on the felt to feed off
of the bait. To bait the felt pour bait into a plastic cup and walk to
each felt strip and stick it about half way down into the bait. For
banana-brown sugar bait initially it helps to have a stick to push the soft
felt strips into the thick bait, but after a while the felt strips will become
harder due to the encrustment of brown sugar, and the stick may no
longer be necessary. It is best that the felt strips are orientated
perpendicular rather than parallel to the direction of the twine.
Otherwise, as one walks the length of the felt line Lepidoptera may be
concealed on felt surfaces opposite to the collector. The felt strips can
be orientated perpendicular by making two folds. First, the top corners
should be folded together (each corner is folded 90 degrees) such that they
form a line pointing down the midline of the felt strip. Then this folded
top area should be folded over 180 degrees, and this folded over area should be
attached to the twine. This results in the felt strip orientated
perpendicular to the twine, as can be seen in the closest felt strip in the
above picture.
The height at which felt strips are
suspended can be important. They should not be so low to the ground that
raccoons can reach up and grab them, or so close to other trees that raccoons
can reach them by climbing trees. An optimal height is slightly lower
than the chest of the collector. The optimal technique is to collect a
specimen by holding a flashlight under one's arm and shining it just to the
side of the felt strip, so a specimen can be seen but is not directly in the
flashlight beam. One should then reach across with a collecting jar (it
is harder to reach up while holding a flashlight under one's arm), holding the
lid of the jar cracked at an angle just slightly above the opening
and positioning the specimen between the opening of the jar and the lid.
HLK has found it is most effective to capture moths on felt by contacting the
moth with the lid of the jar and knocking it down through the opening of
the jar. The jar should be held nearly upright as this is done, so other
specimens in the jar will not slide around and loose scales. Great care
must be exercised to avoid contacting the felt or the twine hard enough to
shake the twine, as this can result in all specimens on felt strips
connected to a segment of twine to flee. For diurnal collecting this
usually cannot be avoided, as it is very difficult to collect most
Rhopalocerans off of felt without netting them, and difficult to net them
without bumping the felt line. In this respect baited trees or traps are
often more advantageous for surveying for bait loving Rhopalocerans; however,
many species of Rhopalocera have a greater tendency to return to a baited felt
line after they are disturbed than is the case for many species of Nocturnal
Lepidoptera.
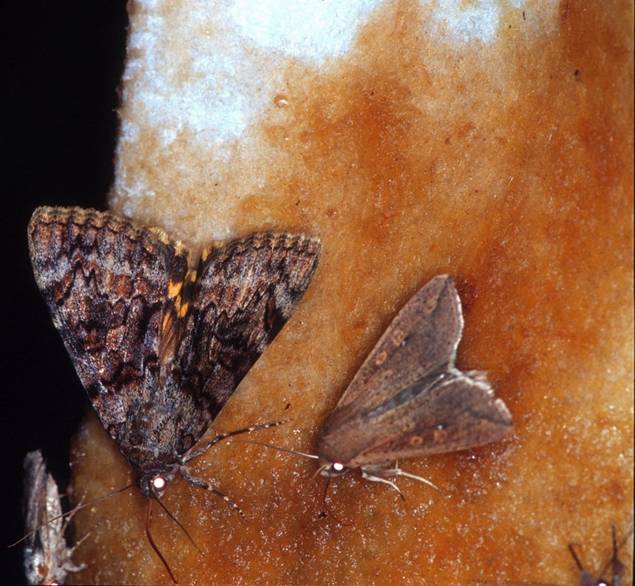
[Add Picture of moths on a baited
tree]
Baited
Tree Trails: For baited
tree trails, trees should be painted with a paste of mashed rotten bananas and
brown sugar. The bait should be applied to trees with a paint brush
slightly lower than the chest level of the collector.
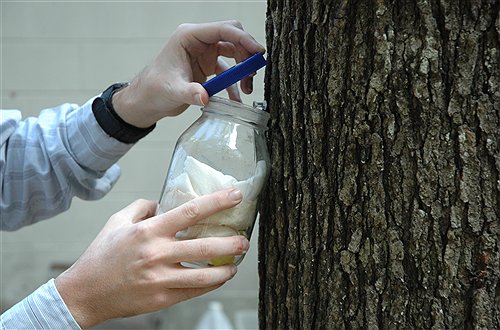
Technique for collecting a moth off of a baited tree. Photo Copyright David B. Wahl
2006. The clear push
pin represents a moth landed on the tree. The lip of the jar is touching
the tree where one should tap the tree with the jar relative to the position of
the moth. If the moth does not fly into the jar, the jar lip should be
slid up the tree until it contacts the moth.
What was stated above under felt
lines with respect to how to shine the flashlight and approach with a jar is
equally applicable to baited trees. However, when collecting moths off of
baited trees the best approach is often not to contact the specimen directly
with the jar, but to tap the tree right below the moth with the lip of a
jar. If the approach is good and the moth has not flown off of the tree
before this tap occurs, for most moth species the specimen will fly into
the jar nearly all of the time. In HLK's experience, for most species
this technique captures the desired specimen off of a tree more often than
trying to knock the moth into the jar by contacting it with the jar or the
cover. However, in some cases the moth will remain on the tree after the
tap, and in these cases the jar lip should be slid up the tree until it
contacts the bottom of the desired specimen, which will usually then fly into
the jar. If the moth flies up rather than down it will hit the cover of
the jar and usually rebound into the jar (recall the cover of the jar should be
angled just over the jar opening on approach). If the moth flies away
perpendicular to the tree it will be between the jar and cover briefly, and a
quick action is needed to close the lid over the moth before it turns and
escapes. If the moth flies off of the tree sideways and
perpendicular to a line between the collector and the tree it will escape
unless it is netted. If a moth escapes the jar after the jar taps the
tree it is very difficult to subsequently capture with a net. An
attempt may be made by immediately steeping back and trying to spot
the moth in a flashlight beam with the net ready to be swung.
However, if a moth flies off of a tree as the collector is approaching the
tree, and the collector is holding a net under their arm, with practice
one can learn to react quick enough to net the moth as it flies off of a
tree at least some of the time. Diurnal and wary nocturnal voucher
species need to be netted. To net a specimen off of a baited tree
approach with the rim of the net below the specimen, and use a net with a firm
rim. If the specimen remains on the tree long enough to get the net right
below the specimen, contact the specimen with the rim of the net touching the
tree below the specimen, and swing up immediately as the specimen flies
off. Scraping the net against the tree when the specimen is landed on the
tree is more likely to result in a miss or a damaged specimen. When
possible it is better to capture moths directly with a jar than with a net,
because in a net it is easy for moths to rub scales off of the dorsum of their
thorax (this problem does not occur with Rhopalocerans, which have the
dorsum of their thorax largely devoid of scales).
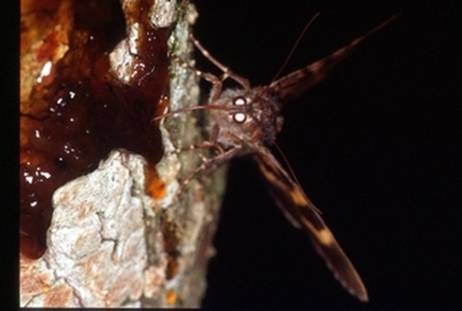
Catocala muliercula feeding at a
baited tree. Photo copyright
Robert J. Borth 2006.
Advantages
and disadvantages of baiting trees versus baiting felt: On a given night either a baited tree trail or a
baited felt line may outperform the other even when the same bait is used for
both, depending on some factors which we are aware of and some we do not yet
understand. Some of the relative advantages of these two techniques are
listed below.
Advantages
of a baited felt line over a tree trunk bait trail
* Bait
will persist longer on baited felt than on tree trunks. However, if good
bait is used in accordance with our recommendations, with either technique it
will remain effective for at least a full night barring rain or animal
interference.
* Many
sites and habitat types lack a large number of easily accessible tree trunks,
especially in the western
* While
it takes longer to put up felt lines initially, once the nylon twine and felt
is up the felt can often be baited more quickly than tree trunks can be
baited. Thus felt lines can be an efficient survey method when one is
conducting surveys at one site over multiple consecutive days.
* Sometimes
a baited felt line attracts more Lepidoptera than a baited tree trail, even
when the same bait is used on both.
* Cryptic
Lepidoptera are easier to see at night on felt strips than tree trunks.
* Apple
sauce-brown sugar bait is effective on a felt line and can be used in
combination with banana mush-brown sugar bait on alternating felt strips.
However, apple sauce-brown sugar bait is generally not thick enough to
persist well on a baited tree trail.
* Baited
felt lines are generally less susceptible to interference by raccoons, unless
they are hanging too low to the ground or within reach of other trees.
However, if baited felt strips are damaged by mammals more time is needed to
correct the problem. If a baited felt line is used in the same location
over many weeks, local raccoons may figure out how to walk along the nylon
twine upside down and access felt strips.
*Baited felt lines are less
susceptible to being mobbed by swarms of ants. When baited felt is used
in an area for multiple nights, ants may eventually find the twine and access
the felt closest to the ends, but this problem can be eliminated by smearing
gasoline on both ends of the nylon twine.
Advantages
of tree trunk bait trail over a baited felt line:
* Initially
it is much less time consuming to bait tree trunks than to put up nylon twine,
attach felt strips, and then bait them. Thus, felt lines are often not
suitable for surveys lasting a single night or under other conditions when
set-up time is limited.
*
Effectiveness of baited felt is adversely affected by wind. When
there is enough wind to blow the felt strips around few moths tend to land on
them. Baited tree trails can remain very effective under some conditions
windy enough to render a baited felt line ineffective.
* If
one bumps any part of a felt line it can scare off all of the Lepidoptera on
all of the felt strips attached to a segment of nylon twine. This makes
it difficult to net individuals of wary species off of a felt line without
scaring away all of the other Lepidoptera present.
* No
clean up work is required for a baited tree trail (banana mush does not persist
in the environment for very long, whereas nylon twine and felt need to be
removed when a survey is over).
* A
baited tree trail is inconspicuous in contrast to a baited felt line, which can
be hit by vandals.
THE TAPPING TECHNIQUE
The tapping technique is primarily for surveying for species in
the genus Catocala (Noctuidae),
although occasional records for other taxa are
obtained from this method as well. Catocala is a
species-rich genus, and many of the species do not readily come to MV or UV
lights in many localities. Many of the
species which infrequently show up at lights may come readily to bait when bait
is attracting many moths, but this is often not the case at times and localities
where these species are present. At some
localities, this survey problem can be addressed with the tapping
technique.
Tapping involves walking through forested areas and tapping tree
trunks with a stick or net handle. If Catocala are
resting on tree trunks in the vicinity of where the tree is tapped, they may
fly off of the tree and become easily visible.
The challenge is then to watch the flight of flushed individuals, and
see where they land. Then one must
carefully approach the Catocala’s
new resting position, and determine if the individual is a desired
specimen. If this is the case, one
should attempt to capture the specimen with a net or jar. Capturing specimens with a jar is ideal for
minimizing scale loss, but many individuals are simply too wary and can only be
captured with a net. Individuals of
certain species tend to be especially wary, such as Catocala lacrymosa. The technique for netting Catocala off of tree trunks is
the same technique discussed under netting moths on bait trails in that
section.
It is often easier to capture desired specimens on tree trunks
if they are spotted on the trees without first being flushed. However, Catocala are often well
camouflaged on their substrate, and tapping trees is often a much more efficient
means of locating individuals.
As is the case with baiting, the effectiveness of tapping is
extremely variable spatially and temporally.
However, we have ideas as to what some but not all of the variables may
be. Tapping is usually the most effective
under hot and sunny conditions, with progressively fewer Catocala seen under cooler or
cloudier conditions. This may be due to
more Catocala individuals resting higher in the trees
where they are not detected by tapping under these conditions. We have not tested this hypothesis, but we
have observed Catocala
flying and landing high up on tree trunks, just below the canopy. Tapping often works best from about
In our experience, some species of Catocala have rarely or never
been found tapping, even at localities where these species are common at lights
and/or bait and where tapping is uncovering many Catocala overall. Some species may rarely land on tree trunks
within reach of a person. It is also
possible some species may both be very well camouflaged on tree trunks and not
prone to flying off when the tree trunks are tapped. Catocala similis may be found during the day but it rarely lands
on tree trunks, and usually lands on the ground or under logs or brush. Catocala abbreviatella and Catocala whitneyi also may be found during the
day, but these species land on the ground rather than on tree trunks. NAJLB volume I notes what specific species
of FL Catocala we have found and not found with
the tapping technique, and upcoming NAJLB volumes will include this type of
information for other geographic areas and for individual survey dates.
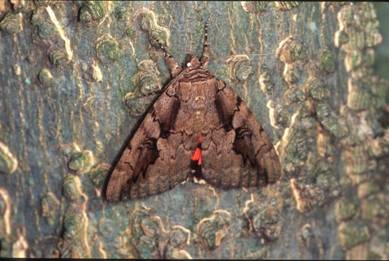
Catocala amatrix resting on a tree trunk: This is an example where a Catocala can be
easily spotted on a tree without tapping first.
Photo copyright Robert J. Borth 2006.
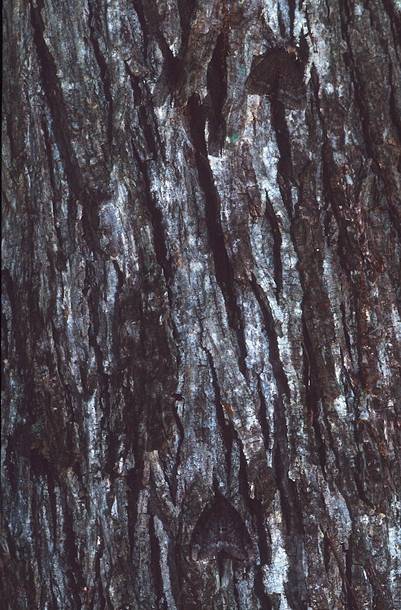
Catocala
residua (two
individuals) cryptically resting on a tree trunk. Photo copyright Robert J. Borth
2006.
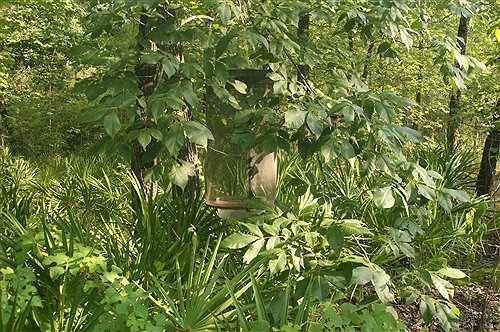
MALAISE
TRAPS
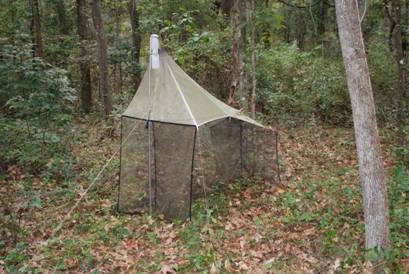
Malaise Trap at the American Entomological Institute property in
Malaise traps provide a flight barrier which some flying insects
will collide with. Some individuals that
collide with the side of the trap then fly upwards into the top section of the
trap, which funnels them into a collecting container with ethanol. Our experience with malaise traps is limited
to Kons’ collecting at the American Entomological
Institute. While malaise traps trap a
large array of Hymenoptera, Coleoptera, Diptera, and Hemiptera which are
seldom or never encountered by the aforementioned survey methods, most species
of Lepidoptera which have been found in the malaise trap are more common at
lights and/or bait. Also, far fewer
Lepidoptera species have been found in malaise traps than with these other
methods. However, two Lepidoptera
species, for which there are few other A.E.I. records, were taken in some
numbers with the malaise trap: Neoprocis floridana (Zygaenidae) and Paratraea plebeja (Sphingidae).
COLLECTING JARS
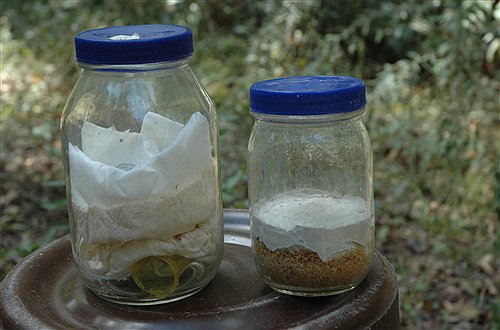
Two
Types of Collecting Jars. Left: jar charged
with ethyl acetate-soaked paper towels stuffed in a pill bottle, with Viva
paper towel substrate. Right: plaster bottomed collecting
jar. Photo Copyright David B. Wahl 2006.
We use two different types of collecting jars in our Lepidoptera
surveys. The left jar type is a
mayonnaise jar. The bottom contains a
narrow prescription pill bottle with the cover removed. A piece of paper towel is tightly stuffed
into this pill container, and soaked with ethyl acetate. The ethyl acetate soaked paper towel in the
pill bottle should be deep inside of the bottle and tightly stuffed such that
there is no possibility any of this paper towel will
stick out past the opening of the pill bottle and make contact with other paper
towels in the jar. Otherwise, ethyl
acetate will wick throughout all of the paper towels and come into contact with
any specimens in the jar. Three layers
of paper towels are placed into the jar over the pill bottle, one at a
time. Each paper towel is folded over twice,
such that the end result is four times the original thickness and ¼ the original
surface area. The paper towels should be
stuffed in the jar such that there are no gaps between the side of the jar and
a layer of paper towel, to prevent moths from getting below the top layer. Any thick paper towels will do for the bottom
two layers, but the top layer should be a very soft and thick variety. The Viva brand is the thick, soft paper towel
variety that we have found to be most suitable, among the varieties we have
tested. The top layer of paper towel
should not be positioned such that it has a low point with sloping sides;
otherwise, if multiple specimens are collected in the jar they will tend to
congregated together in the low point, increasing the chance of scale
loss. Once the jar is prepared, it will
remained charged (saturated with ethyl acetate) for several weeks until it is
used, but once it has been opened numerous times the paper towels in the pill
bottle will need to be recharged with ethyl acetate.
We use the pill bottle type of jar for collecting small to
medium sized moths at a sheet or bait trap, and for collecting at a bait
trail. An advantage of this type of jar
over a plaster jar is that the paper towel substrate is less abrasive than
plaster, and moths are less prone to sliding in the jar and loosing scales. These jars tend to hold a charge longer than
plaster bottomed jars but the concentration of ethyl acetate within the jar
takes longer to reach saturation after the jars is opened. This is a disadvantage for collecting large
moths such as Saturniidae and Sphingidae
which require a higher concentration of ethyl acetate to subdue them quickly,
and for these taxa we usually use plaster bottomed
jars discussed below. A disadvantage of
the pill bottle type of jar is that it is more time consuming to charge than a
plaster bottomed jar, as one must remove and replace the three layers of paper
towels. Also, if the paper towels become
limp, or if one is not careful and leaves gaps between the edge of the paper
towels and the sides of the jar, some specimens may find these gaps and crawl
into them. Moths crawling into such gaps
may slide their wings across paper towels or the side of the jar and loose
scales. After two full collecting nights
we recharge these jars and replace the top layer of paper towels, as the top
layer has typically lost firmness by this point. Specimens can be removed from these jars by
holding the jar upside down with the cover off and tapping the bottom of the
jar, or tapping the lip against one’s hand.
The paper towels may shift when this occurs, and need to be moved back
into place.
Plaster bottomed jars are easier to charge. One merely needs to pour ethyl acetate over
the plaster. When the plaster is
saturated, the excess ethyl acetate can be poured into another such jar or back
into its holding container. The plaster
should then be dabbed with a paper towel so it is not wet on top. An advantage of plaster bottomed jars is
initially they become saturated with ethyl acetate more quickly after they are
charged or opened and reshut. This is why these jars may be more suitable
for collecting large Saturniidae and Sphingidae. These
large moths are also easier to capture with jars with a wider mouth than the
mayonnaise jars, as is the case with many of the commercially available plaster
bottomed jars.
Plaster bottomed jars have several disadvantages relative to
pill bottle jars. Commercially available
plaster bottomed jars typically have metal covers, and do not hold a charge
nearly as long as the plastic covered mayonnaise jars. In addition, plaster appears to not hold a
charge as long as paper towels. Plaster
jars need to be charged at the beginning of each collecting night, and may need
to be recharged during a night. In
addition to the more frequent charging, these jars require more ethyl acetate
to charge than the pill bottle jars. One
can put plaster into the bottom of tighter plastic covered jars to reduce the
need for frequent recharging, but having plaster in tighter fitting jars
increases the likelihood specimens will become permeated with ethyl acetate.
Another disadvantage is that plaster is more abrasive than soft
paper towels, and if these jars are tilted specimens inside may slide on the
plaster and loose scales. If one puts
paper towels over the plaster, ethyl acetate may wick into the paper towels and
permeate specimens. Even without paper
towels over the plaster, we have found that moths left in plaster bottomed jars
more than a few hours often become permeated with ethyl acetate. This is rarely a problem with pill bottle
jars, unless ethyl acetate soaked paper towel ends up sticking outside of the
opening of the pill bottle.
If specimens become permeated with ethyl acetate, they should be
removed from a jar and air dried as soon as possible. Larger and medium sized specimens typically
incur at most minor damage, such as the wing margins curling over
slightly. However, taxa
with large fat reserves in their abdomens seem to be more likely to have the
wings become greased if the specimens were in contact with ethyl acetate. However, small moths that are permeated with
ethyl acetate may incur more serious damage, such as the folding and crinkling
of wings. Collecting small moths with
pill bottle jars greatly reduces the chance of this problem occurring.
With both types of jars, it is important to have the cover open
as little as possible while collecting.
The more the cover is opened, the more the jar will become discharged
and the longer it will take to regain a charge.
If moths in jars are not quickly subdued by ethyl acetate fumes, there
is an increased chance they will damage their wings, with this chance
increasing with larger sized moths.
It is also important to keep jars used to collect multiple
specimens upright as much as possible.
When jars are tilted, specimens in the jar may slide and loose scales,
especially with plaster bottomed jars.
In addition, one should not pack too many moths into the same
jar, or the chance of scale loss increases.
How many moths can be safely placed into a single jar depends on the
size of the moths collected with that jar.
For large moths such as large Sphingidae and Saturniidae, it is generally best to have only one specimen
in a jar at a time. For small moths, a
dozen or more may be collected in a pill bottle jar without the specimens
damaging each other. Large moths should
not be collected with the same jars that already contain small moths, as large
moths will often damage small specimens before they are subdued. Lepidoptera should not be collected in the
same jars as other insects, since many other types of insects take longer to
subdue and will crawl over Lepidoptera specimens denuding them of scales.
When conducting biodiversity blitzes, we like to keep 18 or more
freshly charged jars on hand. On a good
night, during the course of a biodiversity blitz one will need to collect many
specimens to document all of the species encountered. Having a large number of jars enables us to
rotate jars such that we do not have to place too many specimens into one jar
and such that jars have plenty of time to recharge between uses.
Collecting jars should not be exposed to sunlight for any
prolonged period of time, as this will cause condensation on inner surfaces of
the jar. If Lepidoptera specimens
contact this condensation their wings may become stuck to the sides of the jar,
and many scales may be lost when they are removed. Also, paper towels in charged jars exposed to
sunlight will become limp, and need to be replaced.
Specimens should not be left in collecting jars for too
long. We have noted than in plaster
bottomed jars specimens may become permeated with ethyl acetate after a few
hours. Specimens will stay in good
condition in pill bottle jars much longer, but if they remain in these jars
longer than eight hours they may become prone to wing crinkling or greasing. If specimens cannot be field pinned, they
should be transferred from collecting jars into a holding container. Holding containers are discussed under field
pinning below.
Specimens should also not be removed from collecting jars too
quickly, or they may revive. Larger
moths need to be retained in charged jars longer than smaller ones. We recommend leaving moths in charged
collecting jars at least one hour before they are removed. If specimens revive in a holding container
this could be disastrous, as one large specimen that has revived could damage
many others. If a field pinned specimen
revives, it could flap its wings and damage any adjacent specimens. If one is collecting and using a holding
container, it is a good idea to maintain a low concentration of ethyl acetate
in the holding container throughout the night.
This can be accomplished with a soda bottle cover containing stuffed
paper towel soaked with ethyl acetate.
If a field pinned specimen were to revive, the field pinning box should
be placed in a two gallon zip loc bag after a piece of ethyl acetate soaked
paper towel is pinned into a corner. The
bag should be removed after about an hour.
If one is collecting in proximity to a freezer, it is possible
to avoid the use of ethyl acetate altogether.
One can use the pill bottle type jar without the pill bottle, and place
specimens in a freezer shortly after they are collected. The bottom of the collecting jar should have
a substrate like paper towels, because if moths contact a glass bottom in the
freezer they can become stuck to the bottom via condensation when the jar is
taken out of the freezer. Freezing live
specimens without first subduing them with a chemical agent does have its
disadvantages. Larger specimens may
damage their wings in an uncharged jar as soon as they are placed into the jar,
and incur damage before they are subdued by freezing. Also, many specimens that are frozen live
will have their wings fold down perpendicular to their thorax after they are
removed from the freezer. This makes
pinning and spreading these specimens more difficult, especially if they are
dried and later humidified before they are pinned or spread.
Some collectors use cyanide compounds with collecting jars. While these and some other compounds may
subdue specimens quicker than ethyl acetate, we do not use them because they
are so much more dangerous. Also, we
have been told by various people that cyanide compounds tend to dry specimens
out, making them more difficult to field pin or spread. While ethyl acetate is much safer than cyanide
compounds, it is still flammable and unhealthy to breathe. One should never use ethyl acetate around
flame, and collecting jars should only be charged and opened outdoors.
FIELD PINNING
Field Pinning Box:
Field Pinning:
We field pin moth specimens shortly after collecting them in the field.
Once specimens are field pinned, there is no longer a danger of specimens
sliding around and loosing scales in holding containers. Large specimens
should be braced pinned, as sometimes the largest specimens will otherwise
rotate and contact other specimens when driven on bumpy roads. One brace
pine should be placed along the anterior margin of each forewing in the basal
one half of the wing margin, where the coastal vein is strong. This is
illustrated in the above picture for the large Saturniids
Eacles imperialis and
Citheronia sepulchralis.
Brace pinning near the wing apices could result in the specimen shifting and
the pin tearing through or folding over the wing. In contrast to boxes
for the permanent preservation of dried specimens, field pinning boxes where
fresh specimens will be stored at ambient temperatures for several days or
longer should not be air tight. If specimens are placed in tight
containers before they are dried out and stored at ambient temperatures, they
will rot after a couple of days, or perhaps sooner under hot conditions. However, if one wishes to keep specimens
relaxed for spreading without having to humidify them later, a tight field
pinning box will be needed, or alternatively, any schmidt
box sized field box that can be sealed in a 2 gallon Zip Loc bag.
Freshly pinned specimens stored in this manner will need to be kept in a cooler
or portable refrigeration unit if a collecting trip lasts more than a couple of
days. However, freshly pinned specimens
do keep well in tight wooden schmidt
boxes, where they will dry out without rotting. This is not the case with
tight fitting plastic or metal boxes. When field pinned specimens have
completely dried out after a collecting trip, they should quickly be frozen or
fumigated to prevent damage from collection pests. After specimens have
been dried out, cardboard or loose fitting schmidt boxes can be sealed in 2 gallon Zip Loc bags
with fumigant. In the field, loose fitting field pinning boxes should
never be kept on the ground, and should only be outside of a vehicle when a
collector is there working with them and keeping an eye on them. Otherwise,
specimens will be vulnerable to damage by ants or other pests.
A header label should always be placed with sets of specimens
with the same data as soon as they are field pinned. At a minimum the
header label should include the date, survey method, and at least a code for
the survey locality. If the specimens will be left with a header label
for a long period of time before they can be given individual labels, it is
best to include a full data label as the header label, including the additional
information of GPS coordinates, collector(s), and habitat.
If specimens are not field pinned, they can be stored in coffee
cans or rubber maid containers layered with soft paper towels (such as the Viva
brand) or cotton. These containers can then be stored in a freezer
after a collecting trip. However, if these holding containers are
not refrigerated in the field, the specimens will begin to rot after a few
days, or perhaps sooner if conditions are hot or holding containers are exposed
to prolonged periods of sunlight. Holding containers should not be
tilted or specimens may slide and loose scales. It is best to have
specimens field pinned before traveling on bumpy roads.
For Rhopalocera, freshly collected
specimens can either be field pinned or placed into envelopes.
Either glassine or paper envelopes work for this purpose. Specimens
should be placed in the envelopes with the wings folded up, and the ventral
wing surfaces in contact with the sides of the envelope. The dorsal wing
surfaces are more prone to scale loss, and if the wings are folded down in an
envelope they will usually crease such that the specimen can never be properly
spread. We recommend against placing moths in envelopes, because most
moths cannot be identified if only the ventral wing surfaces are visible,
thus dried moths stored in envelopes will need to be spread before
they can be identified. Many Rhopalocera can be
identified in envelopes from the ventral wing surfaces, although identification
is generally easier if both the dorsal and ventral wing surfaces can be
examined.
Humidification of Dried
Specimens
If one wishes to spread specimens that have dried out after field pinning, the specimens will need to be humidified. Rubbermaid makes a variety of tight plastic containers that can be used for this purpose. Paper towels on the bottom of these containers can be saturated with spray-on Lysol, and a piece of styrofoam can then be placed over the paper towels onto which specimens may be pinned. The reason to use Lysol instead of water is to prevent mold growth on specimens. How long it takes specimens to relax will depend on their size, but specimens should not be left in a humidifier at room temperature for more than 12 hours after they have relaxed. Humidifiers containing relaxed specimens may be placed in a freezer, and removed when one is ready to spread the specimens.
It is always easier to spread specimens
fresh than after they were dried out and later relaxed. The major
disadvantage to relaxing specimens is that some specimens are more prone to
having the wings droop after they are spread if they have been relaxed, even if
the specimens have dried out completely before being removed from the spreading
board. This problem frequently occurs with thin bodied specimens, such as
many microlepidoptera, many Geometridae,
deltoid Noctuids, Lithosiini,
and other species which have thin bodies. The problem occurs much less
often with robust bodied specimens and Rhopalocera
(including thin bodied species). Also, some green specimens loose their
green coloration when they are relaxed. For eastern North American
species, this can occur with green species of Nemorinae,
Theclinae, and Noctuidae: Feralia, Cryphia, and
Agriopodes.
It is not necessary to spread most Lepidoptera specimens for the
purposes of vouchering specimens for biodiversity inventory data. Having Lepidoptera specimens spread
is useful for studying hindwing characters and
for specimen photography. For taxonomic studies, it is useful to have
representative series of spread specimens for each species in an area to study hindwing characters. However, for identification
purposes, most Nocturnal Lepidoptera species in
Also, note that the humidification process degrades specimen’s
DNA. Specimens that are to be used for
molecular studies should have legs removed for sequencing prior to any
humidifying.
LEPIDOPTERA FIELD SURVEY
EQUIPMENT SUPPLIERS
NOTE: The below links for Lepidoptera survey equipment
suppliers are provided by the NALBLLC for informational purposes, as all of
these suppliers offer equipment we have found useful to our scientific
research. None of these links were provided at the request of or under
any financial incentive by the suppliers.
Insect Pins:
We recommend the stainless steel insect pins offered by Petr
Kabatek and Martin Hulovec
in the
Rose Entomology:
We recommend this supplier for high quality nets. This supplier formally
offered excellent 175 and 400 watt AC MV light units, but unfortunately to our
knowledge this is no longer the case.
sales@roseentomology.com
www.roseentomology.com
Koehn
Traps: The below web site
provides information on the Koehn bait traps mentioned on this web page in
addition to other Lepidoptera survey equipment.
http://www.leptraps.com/ordering.htm
BioQuip
Products: In addition to several items noted above, this company
offers a wide array of entomological equipment and books.
http://www.bioquip.com/default.asp
33 Watt AC BL UV Lights:
[Fill in Info.]
Walmart: Walmart is a good place to purchase king sized white
sheets, nylon twine, AC photoelectric switches, AC BLB blacklights,
deep cycle outboard batteries, battery clips (clips used to attach a DC UV
light to a battery), 175 watt Mercury Vapor light bulbs, felt, Viva paper
towels, and Rubbermaid containers that can be used to construct trap and wick
components.
ACKNOWLEDGEMENTS:
We are very appreciative of those individuals who
assisted with the construction of traps or other collecting equipment,
including: Hugo and Sharon Kons, Sr., Danny McFather, and Jim Lloyd. In addition, HLK thanks
Richard Merkhofer for providing an inverted cone
platform bait trap when HLK was first getting involved with serious scientific
collecting. In addition, we are especially grateful to David B. Wahl for
taking many of the pictures used on this web page with his digital
camera. We thank David Wahl and the American Entomological Institute for
infrastructural support. Additional acknowledgments for those who
assisted with our Florida Lepidoptera survey project (the Borth
photos on this web page were taken during this project) appear in NAJLB volume
I.